Monday, October 12, 2009

Vegan Dobos Torte (for my birthday)


I came across this dobos torte recipe many months ago, and I could not wait to veganize it. I have no Hungarian roots, and my version is probably nothing like the original, but I don’t care, dammit! I waited to for a special excuse to make it (could I justify making a 10-layer cake and have to eat it all myself? Nope), and that excuse turned out to be my birthday. This cake requires a lot of patience to make, but is it ever worth it!


Vegan Dobos Torte


The cake (adapted from
Bryanna Clark Grogan's vegan sponge cake recipe):
7 tablespoons powdered egg replacer

1 ½ cups cold water
3 cups flour

3 teaspoons baking powder

1 teaspoon salt
2 ½ cups cane sugar

1 1/4 cup soy milk
4 tablespoons canola oil
2 teaspoons vanilla
½ teaspoon almond extract


The icing:

1 cup earth balance

1 cup cocoa powder

5 cups powdered sugar
1/3-1/2 cup soymilk
3 teaspoons vanilla
½ teaspoon almond extract

The caramel:

1 scant cup cane sugar

2 tablespoons earth balance
2 tablespoons lemon juice

First make the cake. Preheat the oven to 400 degrees. In a deep bowl, combine the egg replacer powder and the water and whip it (I used a hand blender) for almost 10 minutes, until it’s very frothy and begins to form peaks. Now mix the flour, baking powder, and salt in a large bowl. In a separate bowl, mix the sugar, milk, oil, and extracts really well (I used a hand blender for this, too). Pour the wet ingredients (but not the egg replacer) into the dry and mix just until combined. Fold in the egg replacer froth and mix as little as possible (just enough to make it homogenous). Now it’s baking time. I must confess that I had a bunch of aluminum cake pans with me, so I sprayed 10 of them and divided the batter amongst the 10 pans right off, baking three at a time. You could do less, or use three pans and wash them after each bake, but I guess I had it easy. Each pan went in for about 10 minutes, until the edges were ever-so-slightly golden. Then I set the cakes between layers of damp paper towel to keep them from drying out.

While the cakes are baking, prepare the icing. Cream the earth balance for a bit, then add the cocoa and mix well. Add the powdered sugar in 1-cup increments, mixing well and adding some soy milk between each cup. Now add the extracts and blend well.


Slice the last cake layer in 16 portions, and be sure to create some space between each slice. Now prepare the caramel. Melt the cane sugar in a small saucepan over high heat (this is quite amazing to see if you’ve never melted sugar by itself). Remove from heat, add the earth balance and lemon juice, and put back on heat until everything dissolves and becomes uniform. Pour over the portioned-out cake layer, and allow to set.

Now it’s assembly time! Stack up the plain cake layers with icing in between (be economical with that icing) and on the sides. Spread icing on top, then pipe sixteen little flowers around the circumference. Split up the sixteen caramelized portions and arrange them on top, with one portion over each flower and angled slightly. Now pipe a big flower in the middle, and you’re done!

Thursday, October 1, 2009

Butternut Cashew Pie


This was adapted from this recipe. It looks great and super-delicious, but in my own cooking I prefer to use more whole ingredients than things like tofutti cream cheese, and why should pumpkin have all the fun, anyway? And from a can, nevertheless. I realized that I could steam and blend chunks of peeled squash, then keep the puree in portions in the freezer to use whenever I want it. Cheap and local, yo!

Butternut Cashew Pie

1 ½ cups raw cashews, soaked overnight and drained
4 tablespoons oil
½ cup cane sugar
2 tablespoons arrowroot
2 tablespoons lemon juice
1 teaspoon vanilla
1 pinch salt

½ cup butternut puree (made by steaming chunks butternut squash and blending)
3 tablespoons cane sugar
½ teaspoon cinnamon
¼ teaspoon ground ginger
¼ teaspoon nutmeg

1 unbaked pie crust (had a graham crust kicking around, but use whatever you want)

Preheat oven to 350 degrees. Process the cashews and oil as finely as possible. Add the sugar, arrowroot, lemon juice, vanilla and salt, blending until smooth. Remove 1 cup of the mixture and spread over the bottom of the pie crust. Add the remaining ingredients to the food processor and blend until smooth. Spread this evenly over the cashew layer. Bake for about an hour – if a knife inserted in the center comes out clean, it’s done.

Curried Adzuki-Edamame Stuffed Kabocha Squash

I love fall. I absolutely love it. When the air feels crisp and you can hear the wind through the trees and colored leaves falling. Cheesy as that sounds, I just love it.

A few weeks ago I got a little over-excited at a farm market and bought six squashes, with no idea as to what to do with them. I knew I would come up with something. Then this weekend, I woke up in the morning and it felt like a particularly autumn-y day, and I thought to myself: “I’m going to make a curried stuffed squash today, and maybe also a squash pie (see other post for the pie recipe). And I felt so healthy and balanced in making and eating it. Sometimes there are more important things than school…


Curried Adzuki-Edamame Stuffed Kabocha Squash

1 large kabocha squash, seeded and quartered

2 tablespoons vegetable oil
1 teaspoon mustard seeds
1 small onion, diced small
2 cloves garlic, minced
1 teaspoon fresh ginger, minced
1 teaspoon curry powder
1 teaspoon turmeric
1 teaspoon cumin
½ teaspoon coriander
¼ teaspoon cinnamon
¼ teaspoon cardamom
1 pinch ground cloves
1 pinch asafetida/hing (optional)
¾ teaspoon salt
2 large tomatoes, diced small
1 sweet red pepper, seeded and diced small
1 cup shelled edamame
1 cup adzuki beans, soaked overnight
1 cup brown rice, soaked overnight
3 cups water (or more, as needed)

Preheat oven to 375 degrees. In a medium-sized pot, fry the oil and mustard seeds together over medium heat until the seeds start to pop. Add the onions and fry for a couple of minutes. Add the garlic, ginger, spices and salt. Fry for a minute or so, then add the tomatoes and pepper and fry for a couple of minutes more. Add the edamame, adzuki beans, rice and water, stir a little, then increase the heat to high and allow to boil. Cover and reduce heat to simmer, and cook for about 35 minutes, adding more water if the mixture gets too dry. Meanwhile, prepare the squash. Place pieces face-down on a greased baking sheet, and bake until the filling mixture is ready. Take the squash out, flip it so the skins are on the bottom, and scoop as much of the filling as you can into the middle of each squash portion, place bake into the oven, and bake for about 30 minutes more. Enjoy!

Sunday, September 27, 2009

Black Bean Brownies with Pumpkin Seeds


I got my blood tested recently (as every good little vegan should) and it turns out that I'm low on iron. Not anemic, but low. So I've been doing a little research on plant foods that are especially good iron sources and incorporating them into my diet more, and also supplementing (hellloooo spirulina, you are my new best friend and I think you're amazing). These brownies are an example of this - they've got black beans, dates, black-strap molasses and pumpkin seeds, all of which are very good iron sources. And the fact that they're pretty damn yummy helps as well.

Black Bean Brownies with Pumpkin Seeds

1 can black beans, rinsed and drained
2 bananas

1/3 cup dates, simmered in enough water to just cover the bottom of a small saucepan until soft
3 tablespoons sugar

2 tablespoons black-strap molasses

1/4 cup cocoa
1 tablespoon cinnamon

1 teaspoon vanilla

1 pinch salt

1/2 cup oats
1/4 cup raw pumpkin seeds

1/4 cup chocolate chips


Preheat oven to 350 degrees. Spray or oil an 8 x 8 square baking pan. Place all ingredients except oats, pumpkin seeds and chocolate chips in a food processor and process until very smooth. Add the oats and process until well incorporated. Fold in the pumpkin seeds and chocolate chips. Pour into baking pan and smooth out surface with a spatula or something. Bake for 35-40 minutes. Let cool, cut into squares, and refrigerate. Enjoy!


They really taste best cold - fudgy and delicious!

Friday, September 4, 2009

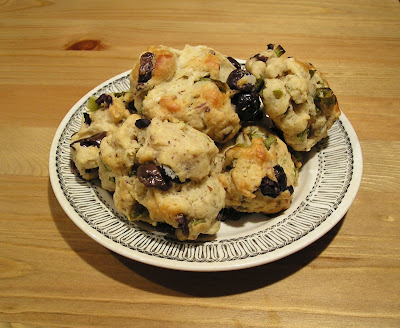
Olive Biscuits


I've been busy these past couple of weeks, finishing up my summer job, doing teaching assistant work, and getting ready to go back to school. I really really hope I can manage to keep up this blog during the school year!

I've also been experimenting with making savoury baked goods, inspired by recipes like these. I figure they're a good way to satisfy my baking monkey and make good and healthy snacks and additions to bagged lunches. So far all of my attempts at savoury muffins have failed miserably, but I'm still working on it. And then I decided to try savoury biscuits and came up with these, based on this recipe. They were a great success!

Olive Biscuits

2 - 2 ½ cups white flour
1 cup whole wheat pastry flour
2 teaspoons baking powder
2 teaspoons flax meal mixed with 6 tablespoons water
1 ¼ cups soy yogurt + extra for brushing on the tops of the biscuits
¾ cup olive oil
1 cup kalamata olives, chopped
5 stalks green onion, thinly sliced
1 handful fresh mint, finely chopped

Preheat oven to 375 degrees. Spray one large baking sheet or two smaller ones, and set aside. In a large bowl, sift together the flours (starting with 2 cups white) and baking powder. Make a well in the middle and add all remaining ingredients. Mix and then knead the dough until it is soft and workable, adding up to ½ cup flour to get the right consistency. Shape into small balls (about ¼ cup’s worth of dough), place on the baking sheet, brush with yogurt, and bake for about 30 minutes, until golden on top.

Tuesday, August 18, 2009

Quick Summer Salad

I don't know about you, but during the summer months when it's hot I tend to want to eat mostly vegetables and fruits and nuts and seeds, and not want to cook too much. The reason why I haven't been blogging much lately is because I've been preparing a lot of salads with ingredients from the farmer's market, and they seem too basic to blog about (but no less delicious!).


This is a great summer salad, easy and fast. I imagine it would go great with barbeque'd tofu, veggie dogs or the like (like coleslaw). There's not even much prep-work involved - you can do all the shredding in a food processor.

Beet, Carrot and Cabbage Salad

Salad:

2 cups savoye cabbage, shredded

1 cup carrots, shredded

2 beets, shredded
1/3 cup green onions, thinly sliced


Dressing:

1/8 cup apple cider vinegar
1/8 cup olive or flax oil
1 teaspoon Dijon mustard

1 teaspoon maple syrup or agave
½ teaspoon salt
a few turns of the pepper mill


Combine the salad ingredients in a large bowl. In a small bowl, whisk together the dressing ingredients and pour over the salad. Toss, and you’re done!

Saturday, August 15, 2009

Lentil Veggie Pockets

I won’t lie, I totally got the idea of making bean-grain-vegetable pockets from one of my favourite blogs. I think they’re awesome – you can easily modify the ingredients and come up with something delicious, and, though they’re a little time-consuming to make and assemble, they freeze great and make a very yummy packed lunch – just grab one out of the freezer when you leave the house, combine it with a good salad and maybe a baked yam or something, and you’re good to go! I’ve been enjoying these veggie pockets for dinner at work all week, and I want to try a chickpea-barley-sage version next!


Lentil Vegetable Pockets (adapted from the Quinoa Lentil Curry Pie recipe from Tofu for Two)

Dough

2 ½ cups spelt flour
1 teaspoon salt

2 teaspoons baking powder
1 ½ teaspoons turmeric
2 teaspoons nutritional yeast

6 tablespoons cold earth balance margarine
¾ cup cold water

Filling


1 cup French lentils

½ cup brown rice

3 cups water

1 cube vegetable boullion
1 onion

3 cloves garlic

1 tablespoon olive oil
2 cups crimini mushrooms

½ teaspoon salt

1 ½ cups chopped tomatoes (one can diced tomatoes would probably also work, just add it to the lentils and rice at the beginning and cook them with less water)

handful fresh thyme

1 handful fresh parsley

1 teaspoon sage

1 tablespoon oregano

½ teaspoon red pepper flakes

1 bunch spinach

juice of 1 lemon
¼ cup nutritional yeast


First, make the filling. Combine the lentils, brown rice and boullion in a large-ish cooking pot. Bring to boil and then simmer for 45 minutes. Now, while the lentils and rice are cooking, get to work! Prepare the vegetables – mince the garlic, chop up the onions, mushrooms and tomatoes, mince the parsley and thyme, and chop the spinach. Fry the onions and garlic in the oil until the onions begin to soften, then add the mushrooms and salt. Fry for a couple of minutes, then add the rest of the herbs and spices and the tomatoes and fry for a couple of minutes more. Dump it all into the pot with the lentils and rice, stir, and continue to cook until the 45 minutes are up. If it starts to look dry, add a teeny bit more water. Once the lentil/vegetables mixture is done, stir in the spinach, lemon juice and nutritional yeast and set aside to cool (until almost room temperature).


Now make the dough. Combine the flour, salt , baking powder, turmeric, and nutritional yeast, mixing well. Add the earth balance and mix, starting with a fork and then using your fingers, until there are no big clumps of margarine. Now add the water and knead until it forms a smooth, workable dough, adding more water if necessary. Chill in the fridge until the filling mixture is cooled enough.

Now assemble. Preheat the oven to 350 degrees. Take out the dough, divide it into 10 portions, make each portion into a ball and then roll it out to circles with diameters of approximately 13-15 centimeters. Spoon some filling into the middle of each circle (about 2 heaping tablespoons), then fold the circle in half, sealing the edges by pressing them down with the tines of a fork. Also poke some air vents in the pockets with the fork. Bake for 25 minutes, until the edges of the pockets start to darken a bit.

If you are freezing them (like I do), one delicious way to have them is thawed and then heated in a frying pan with some olive oil until golden on both sides - I little bit less healthy, I know, but so yummy!

Monday, July 27, 2009

Plum Pear Cardamom Crisp


Perhaps not the most summery thing to make, but I was up early on a Sunday morning listening to Joanna Newsom, and I happened to have some plums and lots of pears (but alas, no peaches), and then this was invented, based on the Apple Cherry Crisp recipe from The Everyday Vegan by Dreena Burton. Enjoy!

Plum Pear Cardamom Crisp

Fruit mixture:
5 pears, sliced
2 plums, sliced
3 tablespoons maple syrup
1 tablespoon arrowroot powder
seeds of half a vanilla bean (or maybe 1 teaspoon vanilla extract)
1 teaspoon cardamom
½ teaspoon cinnamon
1 dash nutmeg
1 dash salt

Crisp topping:
1 cup rolled oats
¼ cup hazelnuts
1 teaspoon cardamom
seeds of half a vanilla bean (or maybe 1 teaspoon vanilla extract)
1 dash salt
3 tablespoons maple syrup
1 tablespoon canola oil

Preheat oven to 350 degrees. Combine all fruit mixture ingredients in a lightly oiled baking dish, mix well and set aside (you could do it in another bowl first, but I’m lazy and this way works). Now grind the hazelnuts in a food processor. Add the oats, cardamom, vanilla seeds and salt and process until the oats are mostly ground. Now mix the maple syrup and oil in with your fingers. Sprinkle the topping evenly over the fruit mixture, lightly pat it down, and put the dish in the oven. Bake for about 35 minutes, until bubbling around the edges and lightly browned. Serve with some yogurt or ice cream.

Tuesday, July 14, 2009

Roasted Potatoes with Pumpkin Seed-Arugula Pesto and Peas

Ok, I'll admit that I'm not actually that original - I tried yummy roasted pesto-potatoes at this restaurant in Victoria, and I thought to myself, "I could do this at home pretty easily," and then I did. And I got the idea for making arugula pesto from this recipe - I love basil pesto as much as the next person, but I can't grow basil in my garden and it's kind of expensive to buy. But the rest is all me.

This is great pretty much any time of day - as a breakfast side dish, a dinner side dish, or a snack. And the pesto on its own makes a yummy sandwich spread.


Roasted Potatoes with Pumpkin Seed-Arugula Pesto and Peas

The Pesto part:

½ cup raw pumpkin seeds
4 tablespoons olive oil
3 tablespoons water
1 teaspoon salt (or more, to taste)
¼ cup nutritional yeast
3 cloves garlic, sliced
juice of 1/2 a lemon
1 large bunch of arugula

Toast the pumpkin seeds in a dry skillet for a couple of minutes (until they start to color), then grind them in a food processor. Add all the other ingredients except arugula and blend until very smooth, then add the arugula and blend again.

The Potato and Pea part:

1 1/2 - 2 lbs potatoes, cut into 1-inch chunks (I used halved baby potatoes)
1/2 cup pumpkin seed-arugula pesto
1 tablespoon olive oil
1 teaspoon salt, or to taste (depends on the saltiness of the pesto)
freshly ground pepper, to taste
1 cup fresh or frozen peas

Preheat the oven to 400 degrees. Toss the potatoes, the 3 tablespoons pumpkin seed-arugula pesto, olive oil, salt and pepper in a large bowl. Spread on a lightly oiled baking dish and bake for 30 minutes, tossing every 10-15 minutes. Add the peas, toss, and bake for another 15-20 minutes, until golden and tender.

Pestotatoes, anyone?

Wednesday, July 1, 2009

Nanaimo Bars - margarine-free!


I've been on a nanaimo bar kick lately for some reason, after not having had any for at least seven years. I was using Sarah Kramer's recipe for awhile, but the 1 cup of margarine in every batch made me feel bad. Not that I am against fat (or sugar, for that matter), but margarine is just so processed and devoid of nutritiousness that I can't justify using a whole cup in a recipe.

So, given that Canada day is tomorrow (and tomorrow has already come, in many parts of the country), I bring you this Canadian delicacy, a tweaked version using primarily coconut oil and avocado for the fat and buttery creaminess. The avocado adds a lovely green color as well. It does not taste any healthier, that is for sure! In the future I may start subbing ground outs and sugar for the cookie crumbs as I don't see why they are really necessary, but this is my current version.

Oh and also, please excuse the messy photos! I royally suck at cutting things (which is why you see more whole cakes and pies than slices of them on this blog...). Please attribute the messiness to my lack of skill and not the recipe itself!

Nanaimo Bars

Bottom Layer:
½ cup coconut oil
1/8 teaspoon salt
¼ cup cane sugar
1/3 cup cocoa powder (dutch-processed is best)
2 tablespoons flax meal
5 tablespoons cold water
½ cup walnuts
1 ¼ cup flaked or finely shredded (or whatever) unsweetened coconut
1 cup vegan graham cracker-ish cookies

Middle Layer:
1 avocado
1 tablespoon coconut oil
1/8 teaspoon salt
2 teaspoon milk (I used coconut because I had it, but soy, almond or rice should also work)
2 tablespoons arrowroot
1 teaspoon vanilla extract
2 cups powdered sugar

Top Layer:
2 tablespoons coconut oil
1 pinch salt
100 g good quality dark chocolate

First, prepare the bottom layer. Melt the coconut oil in a small saucepan on low heat, then add the salt and sugar. Once the sugar is dissolved, add the cocoa powder and stir until smooth. Remove from heat. Meanwhile, process the vegan cookies in a food processor until they become a fine meal. Add the walnuts and lightly pulse, until the walnuts are finely shopped but not powdery. Mix the flax and water in a small bowl, then add to the food processor along with the coconut and chocolate sauce. Process until well-mixed. Press evenly into an ungreased square baking pan and set aside.

Now prepare the top layer. Melt the coconut oil in a small saucepan and add the chocolate and salt, stirring often. Once melted, remove from heat (the top layer is prepared before the middle one because it needs time to cool down).

Now the middle layer. Place all ingredients in a food processor or blender, and blend really well.
Spread the middle layer mixture evenly over the bottom layer, then pour the chocolate sauce on top. Put in the fridge for an hour or so to cool, then transfer to the freezer (otherwise the middle layer will get quite gooey). Before serving, let set at room temperature for a few minutes so the chocolate doesn’t crack when you try to cut it into squares.

Happy Canada day, everyone!

Wednesday, June 24, 2009

Chocolate Hazelnut Mocha Pie

I was so excited when I first went to the farmer’s market in Vancouver to find out that hazelnuts are grown in BC. They are one of my favourite nuts, and now I can justify buying them more often. You can bet that I’ll be making lots of hazelnut fig granola this summer! I used up the rest of my beloved hazelnut butter to make this delicious pie, but that’s okay because I’ll just get more next time I go to the market!


I actually made this a while ago and gave a bunch of it to my landlord as a thank you for him giving me a bunch of arugula from his garden. My desserts for your arugula and mint – it’s a deal☺

Chocolate Hazelnut Mocha Pie

1 pre-baked pie crust (I used this one, but just about any crust should work – if making a plain white-flour crust, I’d recommend substituting some of the flour with ground-up hazelnuts for extra hazelnut yumminess)
1 cup non-dairy yogurt (I used home-made rice yogurt, but soy would probably be better)
4 tablespoons hazelnut butter
200 g good quality dark chocolate
2 tablespoons demerara sugar (or more, depending on the sweetness of the yogurt)
5 tablespoons coffee
1 teaspoon vanilla extract
2 teaspoons powdered egg replacer (or just arrowroot)
Whole hazelnuts for decorating (optional)

Melt the chocolate in a double-boiler (or, like me, by putting the chocolate in a smaller saucepan placed inside a larger one that is filled with 2-3 inches of simmering water). Meanwhile, blend the yogurt and hazelnut butter together. Add the sugar, coffee, vanilla and egg replacer, blending really well. When the chocolate is completely melted, add it to the blender and blend really well. Add this point do a taste test, and if you’d like a the filling a bit sweeter, add more sugar. Now pour the filling into the pie crust, smoothing it out, and decorate with some hazelnuts, if you’d like. Cover it in plastic and pop it in the fridge overnight.

This pie freezes great, too! Oh, how I wish I still had some…

Friday, June 12, 2009

Spiced Rhubarb-Apple-Almond Bread Pudding

If you’ve found yourself with some slightly stale bread and don’t want to just throw it out, take a cue from Laura Matthias (author of Extraveganza, one of my favourite cookbooks) and make bread pudding! All you have to do is cube the bread and leave it out in the open air to dry out (if it’s not in the open air then it might mold, and no one wants that). Once you’ve collected enough dried bread, you can make a bread pudding with it. This is one that I made recently:

Spiced Rhubarb-Apple-Almond Bread Pudding

5 cups cubed, stale bread
1 ½ cups rhubarb, chopped

2 apples, chopped (I didn’t bother peeling them, but you could if you wanted to)
¾ cup demerara sugar
½ cup water

2 – 2 ½ cups almond milk
1 teaspoon vanilla extract

½ teaspoon almond extract
1 teaspoon cinnamon

½ teaspoon cardamom
1 good pinch each of allspice, cloves and nutmeg
1 tablespoon fresh ginger, minced

1 tablespoon arrowroot

1 apple, sliced (for topping)

1 cup almond slivers or chopped almonds (for topping)

Place the bread in a casserole baking dish and set aside. Combine the rhubarb, apples, sugar and water in a saucepan. Simmer for 10 or so minutes, until the rhubarb and apples can be mashed easily. Place the saucepan ingredients in a blender and add everything except the bread and topping ingredients, blending until smooth (or you can put them in a bowl and blend with a hand-held blender, like I did). Pour this mixture over the bread and allow to sit for 30-45 minutes, preheating the oven to 350 degrees toward the end of that time. If all the liquid seems to have been absorbed by then, add some more almond milk and stir gently. Now sprinkle the top with ¾ of the almonds, arrange the apple slices on top of the almonds, and finish by sprinkling on the remainder of the almonds. Bake for about an hour.


I used rye bread for the pudding, which I think made it especially flavourful. While it can be eaten by itself, in my opinion it tastes best with either warmed almond milk or some vegan custard or vanilla sauce – delicious!

(Why is my custard sauce so yellow? I don't know)

A note on the sauce:

Not that you need a recipe for making custard sauce, but here’s what I do:

I heat about 2/3 of a cup of almond milk in a small saucepan until almost boiling. Meanwhile, I whisk 2 teaspoons of vegan custard powder and 1 teaspoon of cane sugar with a couple of tablespoons of almond milk in a small bowl until very smooth. Then I whisk the custard mixture into the saucepan and continue to whisk for a couple of minutes (or else it lumps up) and then I take it off the heat and stir in a couple of crops of almond or vanilla extract (and pour some of it over my bread pudding – there’s lots extra, of course)

Before I had custard powder, I made vanilla sauce – I basically did the same thing as above, only instead of custard powder I added 2 teaspoons of arrowroot. I also added probably twice as much sugar and a full ½ teaspoon of vanilla, and a small pinch of salt as well.

Thursday, June 11, 2009

Roasted Green Pepper and Almond Soybean Dip

I've seen lots of recipes for roasted red pepper hummus and other spreads, but never one with roasted green peppers instead (although I'm sure they must exist). Since green peppers are so much cheaper to buy, I thought I'd try my hand at making a dip/spread with them for a change. They're obviously less sweet, but still make for a yummy dip (especially with raw vegetables like carrots or cucumbers). This one's adapted from Eat, Drink and Be Vegan by Dreena Burton.


Roasted Green Pepper and Almond Soybean Dip

1/3 cup raw almonds
juice of 1 lemon (2-3 tablespoons)

3 tablespoons olive oil

1 can soybeans

2 green peppers, roasted*

1 clove of garlic, sliced
½ teaspoon Dijon mustard

½ teaspoon salt
freshly-ground pepper to taste
¼ cup parsley

In a food processor, grind the almonds to a fine meal. Add all remaining ingredients except the parsley and puree until very smooth. Now add the parsley and puree briefly until incorporated. Makes About 2 ½ cups.


*To roast the peppers, remove the stem and seeds and then quarter them. Toss in a little bit of olive oil, then lay down skin side-up on a cookie sheet and broil for about 10 minutes, until the skins start to blacken (watch closely). Remove from the oven and slide the peppers into a bowl with a plate on top. Once cool, peel off the skins (they will come off easily) and you’re done!

Tuesday, June 9, 2009

Collard Chips, and Sprouts in a Smoothie

So much green stuff, it's not even funny (or maybe it is, I don't know). I went to the farmer's market on the weekend and got a little over-excited about all the new and beautiful greens available; I bought myself one large bunch of collards, a bag of mixed baby greens, a big bag of baby kale, one bunch of dinosaur kale, and one bunch of arugula (I'm sure the farmer thought I was feeding a small family, but it was all for myself). Add to that the fact that I almost always have a jar of sprouts growing in my kitchen (and sometimes forget about them), and that is a lot of green stuff to go through in one week! So, I've been looking for alternative ways to use these things up, and here's what I've come up with lately:


I've known about kale chips for a while, but I never tried them before. Collards seemed like they could work too, and they definitely did - crispy, salty, and papery-thin (not good for dipping, but great on their own). I won't pretend that this is a very original recipe, but here it is:

Collard Chips

1 large bunch collard leaves, stems removed and cut into 3-inch pieces
1 tablespoon olive oil
¼ -1/2 teaspoon salt (depends how salty you want them)
freshly-ground pepper to taste
2 teaspoons nutritional yeast

Preheat oven to 250 degrees. Toss all ingredients in a large bowl until oil and seasonings are evenly distributed amongst the greens, and then spread out on 1 or 2 cookie sheets, making sure no leaves overlap. Bake for 30-35 minutes, until dry and crispy.

I tried to make a green smoothie with sprouts in it a couple of times, and it took some experimenting to come up with something that has enough sweetness and creaminess to somewhat mask the fact that there's sprouts in there. This may be a creamier smoothie than some people are used to, but honestly, it's one of the best I've ever had.


Green Smoothie with Sprouts and Kale

3 baby kale leaves
1/4 cup sprouts (I had a mixture of mung beans, azuki beans, chickpeas, red radish seeds and fenugreek, but that's just what I happened to have in my fridge)
1/2 cup mango nectar (any kind of fruit juice would probably work)
1 frozen banana
1/2 an avocado
1 teaspoon flax oil
1 tablespoon mint leaves (optional)
enough almond milk to thin it out, probably 1/4 - 1/2 cup

Blend the kale, sprouts and nectar/juice in a very good blender or a food processor for a couple of minutes, until it looks a uniform green. Then add the rest of the ingredients and blend again. Then fill your favourite glass (oh yeah, and it has to have a mustache on it or it doesn't count) and raise it up!

Friday, June 5, 2009

Chocolate Avocado Pudding


I blogged about this one a little while back, and now I’m back with a recipe! This time I tried it out with some sugar beet syrup that I had come across (it has a dark flavour, like a cross between agave and molasses), and it was great, possibly even better than with maple syrup. However, the choice is yours. Either way, it will make for a decadent, delicious (and sort of comparatively nutritious) treat, and you can pretend it’s actually good for you!

Chocolate Avocado Pudding

2 avocados
¼ cup cocoa powder
¼ cup + 1 tablespoon sugar beet syrup (or maple syrup or agave)
1 pinch of salt
½ teaspoon vanilla extract

Blend the avocados until smooth. Add the remaining ingredients and blend again until completely smooth. That’s it! Chill in the fridge for an hour, or just gobble it up at room temperature. Makes 2 servings.

Variation: add 1 good pinch of cayenne for some heat!

Sunflower Chickpea Spread

With beginning to make bread from scratch, I’ve been going through bread a lot quicker than usual, and bean spreads are a great way to make a nutritious meal of it and also let the flavour of the bread shine (well, as long as the flavour of the spread is mild enough!). More bean spreads can be expected in the future, that is for sure. This one is a variation on hummus, and makes a nice summery spread. In this picture I’ve made it the base of a delicious veggie-full open-faced sandwich, on my homemade bread along with lettuce from my garden, local organic cucumber, home-grown bean sprouts, and some chives, also from my garden. This spread also makes a very addictive tortilla chip dip!


Sunflower Chickpea Spread

½ cup raw sunflower seeds
½ cup water (or more)
1 tablespoon olive oil (or more)
1 ½ cups cooked chickpeas (or 1 can)
5 oil-packed sundried tomatoes, sliced
2 cloves garlic, sliced
juice of 1 lemon
1 handful fresh sage (or other fresh herb – rosemary or thyme would probably work, too)
1 handful fresh parsley
3/4 teaspoon salt
½ teaspoon red pepper flakes

Toast the sunflower seeds until fragrant. Grind them in a food processor until as fine as possible. Then add the water, oil and chickpeas, and blend, adding more water or oil (if needed) to get a good spread-able consistency. Then add all the other ingredients and blend until very smooth. Done!

Monday, June 1, 2009

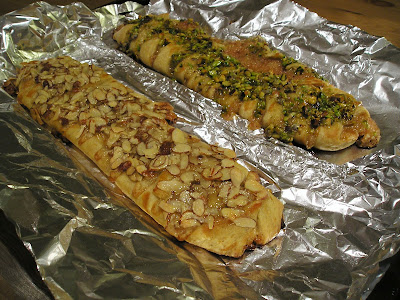
Danish Braid v.2 – Rhubarb-Coconut-Pistachio and Almond


I still had the rest of that Danish dough in the freezer from the end of April, and I knew I had to use it soon. I was planning on making a nut-cream filling, but then I went to the farmer’s market and picked up some rhubarb, and it was practically hollering at me to use it in the Danish braid. And when rhubarb hollers at you, you gotta do what it says.

So I made two smaller braids with the rest of my dough, one was the (maybe) more-traditional almond cream with tosca-style almond topping, and the other was rhubarb-coconut (with a hint of orange) and pistachio topping.

Almond Cream Filling (only slightly altered from the Macadamia Crème recipe in Vegan with a Vengeance)

½ cup blanched, roasted almonds
scant ¼ cup almond milk
¼ cup powdered sugar
½ teaspoon vanilla extract
¼ teaspoon almond extract
½ cup canola oil
1 teaspoon arrowroot

Grind the almonds in a food processor until as finely ground as possible. Add the almond milk and blend to form a thick paste. Add the sugar and extracts, and blend again. While continuing to blend, add the oil in a thin stream. Then add the arrowroot, and blend again. Transfer to a container and refrigerate until cold.


Rhubarb Coconut Filling

1 1/2 cups rhubarb, chopped
1/8 cup water
¼ cup cane sugar (or less if you want a more breakfast-like Danish braid)
juice and zest of ½ an orange
1/3 cup unsweetened shredded coconut
1 teaspoon arrowroot

Combine the rhubarb, water, sugar, and orange in a small saucepan. Simmer for 5-10 minutes, until the rhubarb can easily be mashed with a fork. Mash the rhubarb, add the coconut and cook for a minute or so. Add the arrowroot, mix it all together and remove from heat. Let cool, transfer to a container and then refrigerate until cold.

After letting the dough thaw in the fridge for a couple of days, I rolled it out to ¼ inch thickness and split it into two rectangles. I then followed the rest of my directions for making the Danish braid. The only thing different that I did was to add a topping. I used the Tosca Topping from Tofu for Two’s Tosca Cupcakes (will I ever tire of that blog? not any time soon) for the almond braid, and I followed the same directions, substituting chopped pistachios for the slivered almonds, for the rhubarb-coconut pistachio braid. After rotating the pan in the oven and turning down the oven heat, I pulled the braids out and spooned on the toppings, then put them bake in the oven until they were done (it took about the same length of time as it did for the larger braid). That was it! Not too much work for something so delicious.


Unfortunately the rhubarb-coconut pistachio braid opened up after I put the topping on. Maybe the weight was too much for it to handle? Oh well, it still tasted damn good.

And no, I don’t eat portions the size of the ones you see at the top! I’ve decided to bring half of both of them to the people at work tomorrow, so I won’t eat them all myself (and I’ll freeze some, too).

Happy 1st of June!

Another Rice Bowl + Beet Soup


As I'd mentioned earlier, I'd said I was on a dragon bowl roll. But then it got jilted a bit. This one I made with the intention of making something that seemed starchy and comfort food-y, but wasn't actually very bad for you. I'm going to tweak the recipe a bit more, but in it I had (besides brown rice): baked Jerusalem artichokes and carrots, kale, some leafy greens from the market that I forgot the name of. The whole thing was topped with a garlicky tahini nutritional yeast sauce and then garnished with home-sprouted mixed bean sprouts. Oh yeah, and there was marinated tempeh in there as well.


Beet soup (Borscht? What makes a Borscht anyway?) with carrots, red cabbage, red onion, garlic, broccoli and some homegrown herbs (parsley, sage, rosemary and thyme, just like in the song). More tweaking needed, but it was good and satisfying.

Yellow Blueberry Yogurt Muffins

I devised this as a way to help use up a copious amount of berry soy yogurt I had acquired earlier. The flavour reminds me of a blueberry bundt cake that my mom made when I was little. Actually, this batter would probably make a pretty decent bundt cake as well.


Yellow Blueberry Yogurt Muffins

1 cup of spelt flour
½ cup sugar (I used demerara, but cane sugar would probably up the yellow-ness)
1 teaspoon turmeric
1 teaspoon cardamom (optional – I love cardamom and you can’t stop me from adding it to everything)
1 tablespoon baking powder
¼ teaspoon salt
1 cup berry soy yogurt
2 tablespoons flax meal
1 teaspoon vanilla
1 tablespoon canola oil
zest of one lemon
1 cup frozen blueberries
2 tablespoons demerara sugar, for sprinkling on top (optional)

Preheat oven to 350 degrees. Combine dry ingredients in a large bowl, mixing well. Mix the wet ingredients in a separate bowl. Add the wet ingredients to the dry and mix, but not too much (to avoid gumminess). Fold in the blueberries. Pour into a sprayed muffin tin, filling ¾ of the way up. Sprinkle tops with demerara sugar. Bake for 30-35 minutes, until a knife inserted in the center comes out clean. Makes 9-10 muffins.

Seedy White Chocolate Clusters

I made these to give away to some fellow vegan bloggers, the good people behind Veganachronism and the Year of the Vegan, when we went out for lunch one day. They were well-received.

These little guys may not look like much, but they are certainly tasty, and my favourite way to use vegan white chocolate chips. They make a good snack cookie thing, what with all those seeds in there.


Seedy White Chocolate Clusters

1 ¼ cup combination of pumpkin seeds and sesame seeds
¼ cup raisins
1/3 cup vegan white chocolate chips
¼ teaspoon salt
¾ cup spelt flour
½ teaspoon baking powder
3 tablespoons maple syrup
1 teaspoon vanilla
3 tablespoons canola oil
2 or more tablespoons almond milk or water

Preheat oven to 350 degrees. Toast the seeds together in a dry skillet until fragrant (not very long). Set aside to cool. In a large bowl, stir together raisins, chocolate chips, salt, flour, and baking powder until well-combined. In a small bowl, combine maple syrup, vanilla, oil and milk or water. Once the seeds are cooled, add them to the dry ingredients, mix, and then add the wet ingredients. If the mixture isn’t coming together easily, add a bit more milk or water to help it out. Spray a cookie sheet or line with parchment, and scoop out 1-2 tablespoons of the mixture, forming it into a ball with your hands, and place it on the cookies sheet. Repeat with the rest of the mixture. This is a tad messy - you’ll probably need to rinse your hands a few times in the process. Bake for approximately 12 minutes, until they start to colour a little bit. Makes 14-18 clusters.

Tuesday, May 19, 2009

Camping + Food

I just got back from camping on Vancouver Island and it was beautiful and fun! But I will bypass the beautiful and the fun part and talk about the food. My camping companions were all non-vegans, so they told me in advance what they had planned to make/eat on the trip and I armed myself so that I wouldn’t feel like I was missing out on any of it. It was agonizing having to decide what to take only because there were so many possibilities! I wish I could make a fire in my backyard and pretend I’m camping just so I can try all the camp foods that I wanted to try. Those people who think vegans have a limited diet, they are crazy.

I went a little overboard with the food-making and ended up with enough to feed four Angelas, but that is okay because now I don’t have to cook for the rest of the week. For pre-made things, I brought vegan marshmallows (which I had ordered online from Pangea and miraculously arrived at the very very last minute, making me appreciate them that much more) and tofurky sausages for roasting over the fire (because I prefer them to veggie dogs any day). For homemade things I brought raw vegetables and almond-red-pepper hummus, potato salad, balsamico roasted vegetables for roasting over the fire, kering tempe, pancake mix, hazelnut fig granola, apples and pears, and Nanaimo bars (because I’m a dork and liked the idea of eating Nanaimo bars in Nanaimo).


Here I must admit that this was definitely car-camping and not back-woods camping. We had running water nearby and there was a truck that came around selling firewood fairly regularly. But it was still fun, and a nice break. My companions even brought a can of whipped cream for putting on their homemade crepes for breakfast on the first morning. I, meanwhile, enjoyed my sunny seedy orange pancakes (I prepared the wet and dry ingredients separately and then combined them along with the OJ right before frying) with chopped strawberries and maple syrup.


Everyone loved the potato salad.


Roasting the vegetables was a fun time. I had prepared them in their marinade and wrapped them in tinfoil and put in ziplock baggies before I left. Once the fire got going and a bed of coals built up, we put the tinfoil bundles on the coals and then put wood on top to seal in the heat (and thus I learned how the first oven originated :P). They took slightly less time to cook than in my home oven.


The Nanaimo bars also went over really well, but sorry, no photos ☹.

Other things we made (everyone) were: fire-roasted baby potatoes, asparagus and zucchini (with simply oil, salt and pepper to season), and banana boats (banana stuffed with marshmallows and chocolate bits). And there were of course roasted plain marshmallows, roasted tofurky sausages, and lots of camp coffee (the first time I’ve had coffee in a long while – a rare indulgence). Mmmm, camp food…

Hazelnut Fig Granola


I adore figs and hazelnuts, and even more in combination. I’ve been dreaming of combining them in granola-form for a while now, and while I was trying to figure out what to take on my recent camping trip, I decided to go for it. Here’s what I came up with, using this recipe as a loose base:

Hazelnut Fig Granola

2 cups rolled oats (although I was thisclose to using barley flakes…maybe next time…)

½ cup flour (I used brown rice flour)
1/3 cup chopped hazelnuts
½ cup flax meal

¼ teaspoon salt

3 tablespoons hazelnut butter
3 tablespoons canola oil

2 tablespoons blackstrap molasses
2 tablespoons maple syrup

1 cup chopped dried figs (I prefer black mission figs)

Preheat the oven to 350 degrees. Oil/spray a rimmed baking sheet and set aside. In a large bowl, mix together the oats, hazelnuts, flour, flax, and salt. In a smaller bowl, whisk together the hazelnut butter, oil, molasses and maple syrup until emulsified. Fold the wet ingredients into the dry and mix well. Spread out on the baking sheet and bake for approximately 25 minutes, stirring every 5-10 minutes, until lightly browned. Once taken out of the oven, stir in the figs and voila, done!

Wednesday, May 13, 2009

Banana-Blue-Bread


I had some bananas to use up, and I was inspired by this recipe to make some banana bread with cardamom in it (because cardamom is my favourite spice in the whole world!). I think blueberries go pretty well with cardamom so I added them in, and I made some modifications so I could use maple syrup instead of the sugar (I’m taking a break from any type of cane sugar for the time being). Oh and I used spelt flour too. Here is the adapted version:

Banana-Blue-Bread

¼ cup coconut milk
1/3 cup almond milk
½ cup maple syrup
1 tablespoon coconut oil (or any kind of vegetable oil)
1 teaspoon vanilla
2 ripe bananas
2 heaping cups spelt flour
1 teaspoon cardamom
1 teaspoon cinnamon
1 ½ teaspoons baking powder
½ teaspoon baking soda
1 cup frozen blueberries

Preheat the oven to 350 degrees F. Oil/spray a loaf pan. Blend together the coconut milk, almond milk, maple syrup, coconut oil, vanilla and bananas. In a large bowl, combine the spelt flour, cardamom, cinnamon, baking powder and baking soda. Pour the wet ingredients into the dry and stir until just mixed. Fold in the blueberries. Pour batter into the loaf pan and bake for 45-50 minutes, until a knife inserted in the center comes out clean.

Tip: If the top starts to brown up before it’s ready, put a piece of tinfoil over it so it doesn’t brown too much.

Comfort Food

Ever had those days when you feel like crap and all you want to do is stay in and not talk to anyone and say ‘screw the world’? Well I did, last week. The weather was dreary and I was feeling tired and bummed out for no good reason, so I decided to make some ‘feel-good’ food and watch Leningrad Cowboys Go America. As an ending to my bad day, the film-watching didn’t happen (I haven’t been able to find it on dvd anywhere around here and the version I had downloaded on my roommate’s computer wouldn’t open on mine) but the food part was good. And I’ve since located and watched the film (very funny, check it out – Aki Kaurismaki is great) so all is well, but I digress. Back to the food.


I made baked tofu with yogurt sauce, fried mushrooms and onions, and potato-yam-sage pancakes, with a little green salad on the side. I was quite pleased with the pancakes – all I did was boil a potato and a yam, mash them together (with the skins on to retain nutrients), mix in some almond milk, bread crumbs, minced onion, sage, paprika, salt and ground pepper, shape them into pancakes and fry until browned. A good, satisfying, comforting meal.


Then for dessert (even though I said I was going to lay off the sweets for a while) I made chocolate-avocado mousse. I didn’t use measurements so I can’t post a recipe yet, but next time I make it I will certainly use measurements and post it! Maple syrup is the sweetener, and it is very rich and chocolaty so this keeps me from consuming too much at once. It’s not terribly unhealthy either, even though it tastes like it is. A good ending to a good meal!

Thursday, May 7, 2009

Dragon Bowl v.1 - Sesame!

I have a feeling that I’m going to make a lot of dragon-bowls in the coming weeks. What makes a dragon bowl? I'm not exactly sure, but the ones I’ve seen have consisted of a grain (usually rice), a bunch of vegetables (cooked/raw), something protein-rich (usually tofu), and a dressing to bring it all together. And it’s always served in a bowl (but that’s a no-brainer, right?). Can a dragon bowl have beans instead of tofu? That is what I'm wondering right now....

This version is for sesame lovers. It’s got rice as a base, marinated and sautéed garlic-ginger-sesame tofu, raw carrots, daikon and green onion combined with sautéed kale and cabbage, and a sesame dressing with lots of tahini. It is very tasty, salty and satisfying, and the different vegetables give it a nice combination of different flavours and textures. Yum! This photo does not do it justice…


Sesame Dragon Bowl

½ lb extra-firm tofu, pressed

Marinade:
2 cloves garlic, minced
1 inch ginger root, minced
1 tablespoon sesame oil
4 tablespoons soy sauce
½ teaspoon agave nectar

1 cup brown rice
2 cups water
1 bunch kale, thinly sliced,
1 cup green cabbage, chopped
1 carrot, grated
½ daikon, grated
2 stalks green onion, thinly sliced
2 tsp sesame oil

Dressing:
3 tablespoons sesame oil
4 tablespoons soy sauce
4 tablespoons tahini
1 teaspoon nutritional yeast
½ teaspoon agave nectar
2 tablespoons toasted black sesame seeds (for garnish)

Marinate the tofu: The tofu must be pressed – wrap the block in a dishtowel, put something heavy on it (I used a plate with a can of beans on top) and let it sit for a couple of hours – this will make the tofu firmer and it will also absorb flavours better. After pressing, cut the tofu into ½-inch cubes. Combine all the marinade ingredients in a shallow pan, add the tofu, toss to coat, cover and put in the fridge for a couple of hours.

Start cooking the rice (I’m sure you already know how to cook rice – combine rice and water in a saucepan, bring to a boil and then simmer for 35 minutes or so, until the liquid is gone). While the rice is cooking, prepare the kale, cabbage, carrot, daikon and green onion. Combine the dressing ingredients in a small bowl and mix well. 10-15 minutes before the rice is done, remove the tofu marinade from the fridge, scoop out the tofu with a spatula or slotted spoon and sautee it in the sesame oil at medium heat for 5-10 minutes. Add the kale and cabbage and sautee for about 5 more minutes, until the kale has shrunk a bit and turned a more vibrant green.

Divide the rice amongst 4 bowls. Put the tofu mixture on top of the rice, and then the grated daikon and carrot on top of the tofu. Dollop the dressing over-top, and then garnish with the black sesame seeds. Enjoy! Makes 4 large servings.

Three Little Cupcakes

Last week I got Vegan Cupcakes Take Over the World (by Isa Chandra Moskowitz & Terry Hope Romero) from the library. I was hesitant to look at a cookbook solely dedicated to desserts (I usually come up with too many dessert ideas as it is) but I’ve heard so much about this one, I had to give it a try. Sure enough, within five minutes of browsing through the book I began salivating and forced myself to put it away until I had someone (besides myself and my roommate) to give cupcakes to.

Then on Monday, I found some little excuses to make cupcakes: some for my landlady (as a thank-you because she gave me some pots to start a vegetable/herb garden in the backyard) and some to give to my coworkers on the first day of my summer job. I made three half-batches so that I could give away a few of each while keeping one or two to sample myself (I’m selfish like that).


I made (pictured from left to right): Simple Vanilla and Agave Nectar Cupcakes (made with spelt flour) filled with Super Natural Agave Icing and topped with additional agave icing and Not-Too-Sweet Blueberry Mousse; German Chocolate Cupcakes (Your Basic Chocolate Cupcake topped with Coconut Pecan Fudge Frosting); and Rosewater Cupcakes (I omitted the pistachios from Pistachio Rosewater Cupcakes, upped the rosewater a bit, filled them with rose petal jam, and topped them with pink-tinted rosewater Buttercream).

All of them were excellent, with the exception of the blueberry mousse - next time I’ll omit the lemon extract, which I found overpowering. I’ll also add slightly more arrowroot and agar than the recipe calls for, because the mousse was thinner than I’d prefer. Overall though – excellent. Definitely a cookbook worth having for amazing buttercream icing and special occasions (the rest of the time I’ll have to hide it somewhere for health/safety reasons).

While in the kitchen, my roommate asked, “what if she (the landlady) doesn’t like cupcakes?” and I said, “everyone likes cupcakes,” then he said, “I don’t really like cupcakes,” so I said “you don’t count.” But he likes them now. Oh yes.

Now I think I’ll take a break from sweets for a little while…

Monday, May 4, 2009

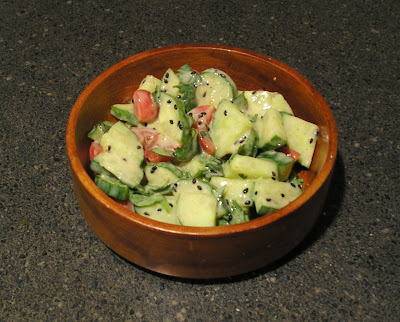
Cucumber Raita (sort of)

The truth is, I’ve never had raita at a restaurant or anything, so I could be completely wrong. But I got this book called Indian Vegetarian Cooking at Your House (by Sunetra Humbad and Amy Schafer Boger) from the library last week, and I thought that the Cucumber Raita might go well with the rest of the khichdi I made a couple of days ago. So I adapted the recipe in the book, and came up with this:


Cucumber Raita

1 large English cucumber, chopped

1 large handful cherry tomatoes, quartered

3 tablespoons cilantro, chopped

1 tablespoon onion, chopped

1 tablespoon cumin

2 tablespoons black sesame seeds
1 cup soy yogurt
2 tablespoons non-dairy milk

½ teaspoon salt
2 pinches cayenne


Combine the cucumber, tomatoes, cilantro and onion in a large bowl, and set aside. Toast the cumin and sesame seeds in a dry skillet until fragrant, stirring constantly so they won’t burn, then let cool. Combine the yogurt, milk, salt and cayenne in a smaller bowl, then add the cumin and sesame seeds, mixing well. Pour the yogurt mixture over the chopped vegetables, and toss together. Done!
Makes 4 big servings.

It’s probably not authentic at all, but this salad was good nevertheless – refreshing and spicy at the same time. I enjoyed it with the khichdi and some steamed broccoli.